Help & Resources
Instructions on how to use this site, navigate it, and what it's all about. This page also has resources that you can use on your own sites and pages.
This is a digital clubhouse for Lord Horse Domain where members can create their own pages (Clubhouse) and link to other spaces on the web (Neighborhood).
If you're in LHD and want to join the clubhouse, send a message to Marc / Scribblemakes in the #webbed-sites channel in the server.
Rules and Starting Guide
Are there rules to the Clubhouse?
- Be mindful and respectful of other users when interacting with them in the server, in their page's guest books, and comments sections. Any homophobia, xenophobia, transphobia, ableism, racism, and other bigoted or derogatory behaviours will not be tolerated.
- When adding things to your pages make sure they're in line with the Neocities Terms of Service. Any material that breaks the TOS will be removed, and in serious situations your access to the Clubhouse may be revoked.
- You can post content that includes sexual themes, violence, and strong language (if I'm reading the Neocities terms correctly). If your website contains potentially adult or sensitive content then it will be tagged on this page. For example, pages that use flashing images will be labelled to help photosensitive viewers. However: Themes like photography of real gore, photography of real torture, bestiality, pedophilia, and incest will not be tolerated.
If you think your site has been labelled incorrectly, or needs a label, please contact Marc / Scribblemakes in the #webbed-sites channel in the LHD server. - Do NOT discuss or link to sensitive content on other users' guest books or comment sections unless you've been asked to directly by that user OR the user's page is labelled to already include similar sensitive content. I.e. if a user doesn't show sexual themes / violence / flashing images / etc on their page and doesn't want to see them: don't send it to them.
- This Clubhouse is open to LHD members ONLY. Non-LHD members can add the webring to their pages but cannot be included in the webring or in the Clubhouse. If you're a LHD member and want to join, send a message to Marc / Scribblemakes directly and you'll be given the log-in information to access the site.
- Do not share the Neocities' log-in information with anyone who is not included in the Clubhouse, this includes users in the Neighborhood who aren't in the Clubhouse.
- Do not share any sensitive information about yourself or other users, such as full names, home addresses, and other identification.
- Do not edit anything outside of your assigned folder. This includes any files in the root folder like index.html or siteStyle.css. If you need any information to be updated on those pages / files, contact Marc / Scribblemakes on Discord.
- As a user, you should NEVER enter another user's folder unless given explicit permission from that user.
- Backups of the whole site are made every week on Sunday UTC+10. Feel free to contact Marc / Scribblemakes on Discord if you need your pages rolled back to a previous version or need to fix an accidental edit.
Step by step guide to making your page in the Clubhouse
Regardless of if you complete a tutorial or not, you can follow the steps below to get started:
- Go to Neocities.org and log in using the details you were given. If you do not have the username and password for the Clubhouse, contact Marc / Scribblemakes on Discord.
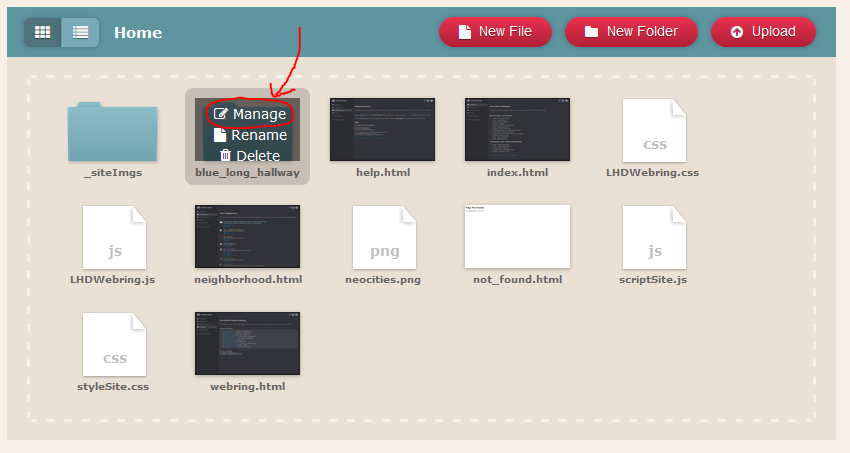
- Navigate to the folder labelled with the room you chose. This tutorial will use a placeholder room named "Long Blue Hallway". When you hover over the label you'll see 3 options, click 'manage'.
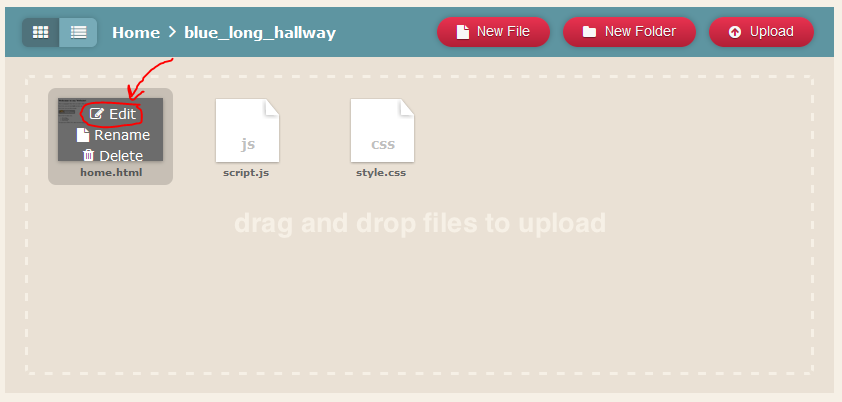
- Inside that folder you'll find three files, home.html, style.css, and script.js. Click on your home.html file and select the 'edit' option.
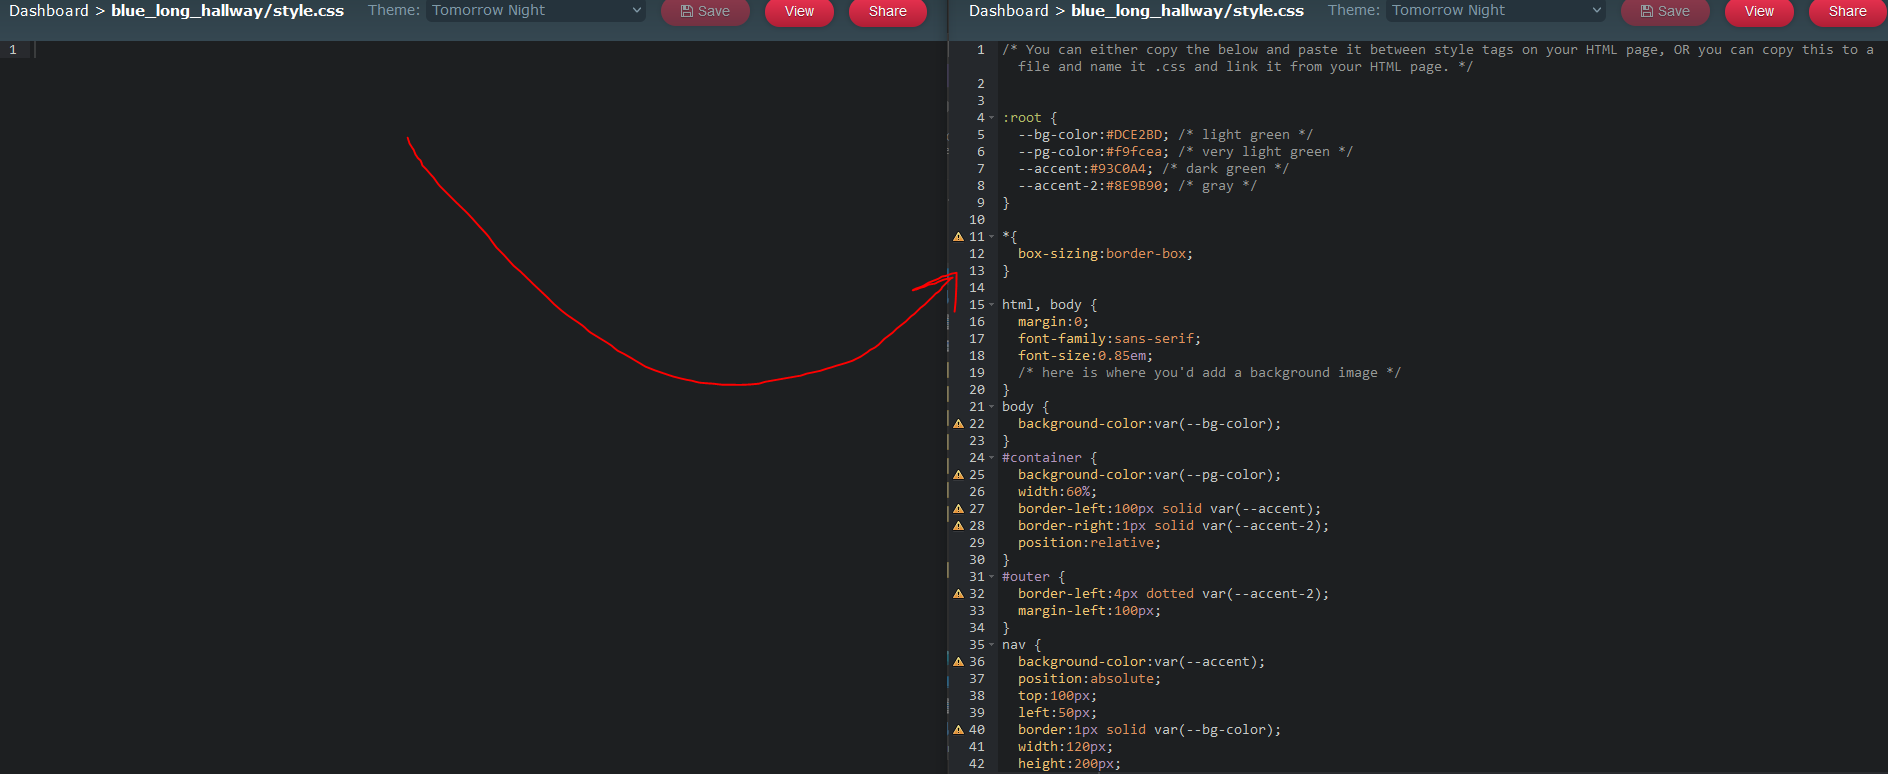
- You'll open to a screen full of HTML code that will look like the image below. The next few steps will take you through editing it.

- Start with the <head> section. Go down the list of items in it, each starting with a <, and fill in or delete as desired:
- If your website is not going to be written in American English, go to the <html lang="en-US"> tag and replace "en-US" with the language code you'll be using. To find your language code, go to W3 Language Codes. You can also delete the 'lang' part so it only reads as <html> if language isn't important.
- Do not change the <meta charset> or <meta name="viewport"> tags.
- The Keywords meta tag lets search engines know what type of page you have, like Tumblr tags. Replace "TAG1, TAG2, TAG3" with tags relevant to your site, such as "Bugs, recipes, science", or you can delete the whole line if you don't want to use tags.
- The Description meta tag provides the description in search results and link previews. Replace "PAGE DESCRIPTION" with your page description or something about yourself, you can also delete the line completely if you don't want a description.
- The Author meta tag lets people know who made the webpage, you can delete the line if you don't want to share that information.
- The stylesheets are connected to your style.css file and the webring file. Don't worry about them for now.
- Your title displays in link previews, search engines, and in the browser tab. Replace 'HOME PAGE' and make sure the replacement is between the two title tags. For example: <title>My First Webpage</title>
- Your icon displays in the browser tab and search engines. You can leave the icon as it is and it'll use the default LHD Clubhouse image.
If you want to use a custom image, click here.
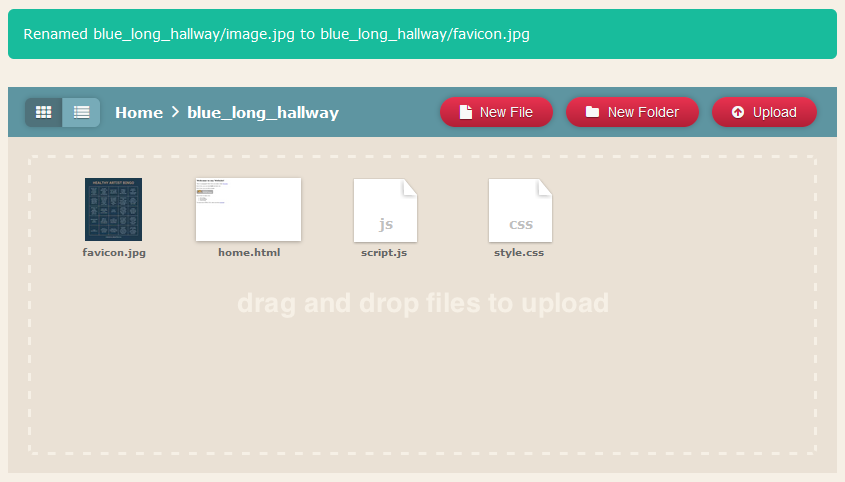
- In your folder view, where you can see home.html, style.css, and script.js, drag the image you want to use into the box or upload it with the upload button.
- Rename the image to [ROOM NAME]/favicon.(filetype) (example: blue_long_hallway/favicon.jpg).
- Go back to your home.html file and replace "https://lordhorse.neocities.org/_siteImgs/favicon.png" with "favicon.(filetype)" (example: "favicon.jpg").
- Hit save, and then navigate to the <body> section to begin building what's on your page. There are two ways you can proceed from here, either from scratch or with a premade template. This tutorial will go through both processes.
Using a website builder or premade templates
There are plenty of resources online for premade templates that you can easily copy and paste into your webpages. Fantastic sources are Sadgrl.online's Layouts and webmaster links. There are also some premade templates at the bottom of this page in the 'Resources' section.
This tutorial will show using the 'Skinny 00s' layout from Sadgrl's site, but the process is similar across all website templates.- Copy the code provided in the 'HTML' box of your template and put it between your two <body> tags, then save your file. If you're using a website builder you may need to generate your layout first before it provides the HTML.

- Save your file and then view it. If it appears as a plain text page with no formatting, not looking like your layout, then you'll need to follow this step to add the CSS. If it does look like your layout and is formatted, skip to the next step.
To add your CSS, return to your folder view where you can see your style.css file. Edit style.css and copy the CSS provided by the template into the file. Save it and then return to your page view, when you refresh the page it should look like your layout. If it still doesn't, try clearing your cache.
- To fill in your page go to your home.html file and look at the code you copied into the <body> section. You can now start to replace filler text with your own to make your page. Below are some code examples to use and what your code might look like when it's filled in.
                          <!-- Links use the <a> tag, href is the URL of the image and the text in the middle is what is displays -->

                          <a href="URL HERE">TEXT HERE</a>

                          <a href="https://lordhorse.neocities.org/">Lord Horse Domain</a>

                          Lord Horse Domain


                          <!-- Images use the <img> tag, src is the URL of the image and it doesn't need a closing /img tag -->

                          <img src="URL HERE">

                          <img src="_siteImgs/favicon.png">

- Copy the code provided in the 'HTML' box of your template and put it between your two <body> tags, then save your file. If you're using a website builder you may need to generate your layout first before it provides the HTML.
Creating a page from scratch
This section will act as a very basic HTML and CSS tutorial that walks you through creating the layout below:
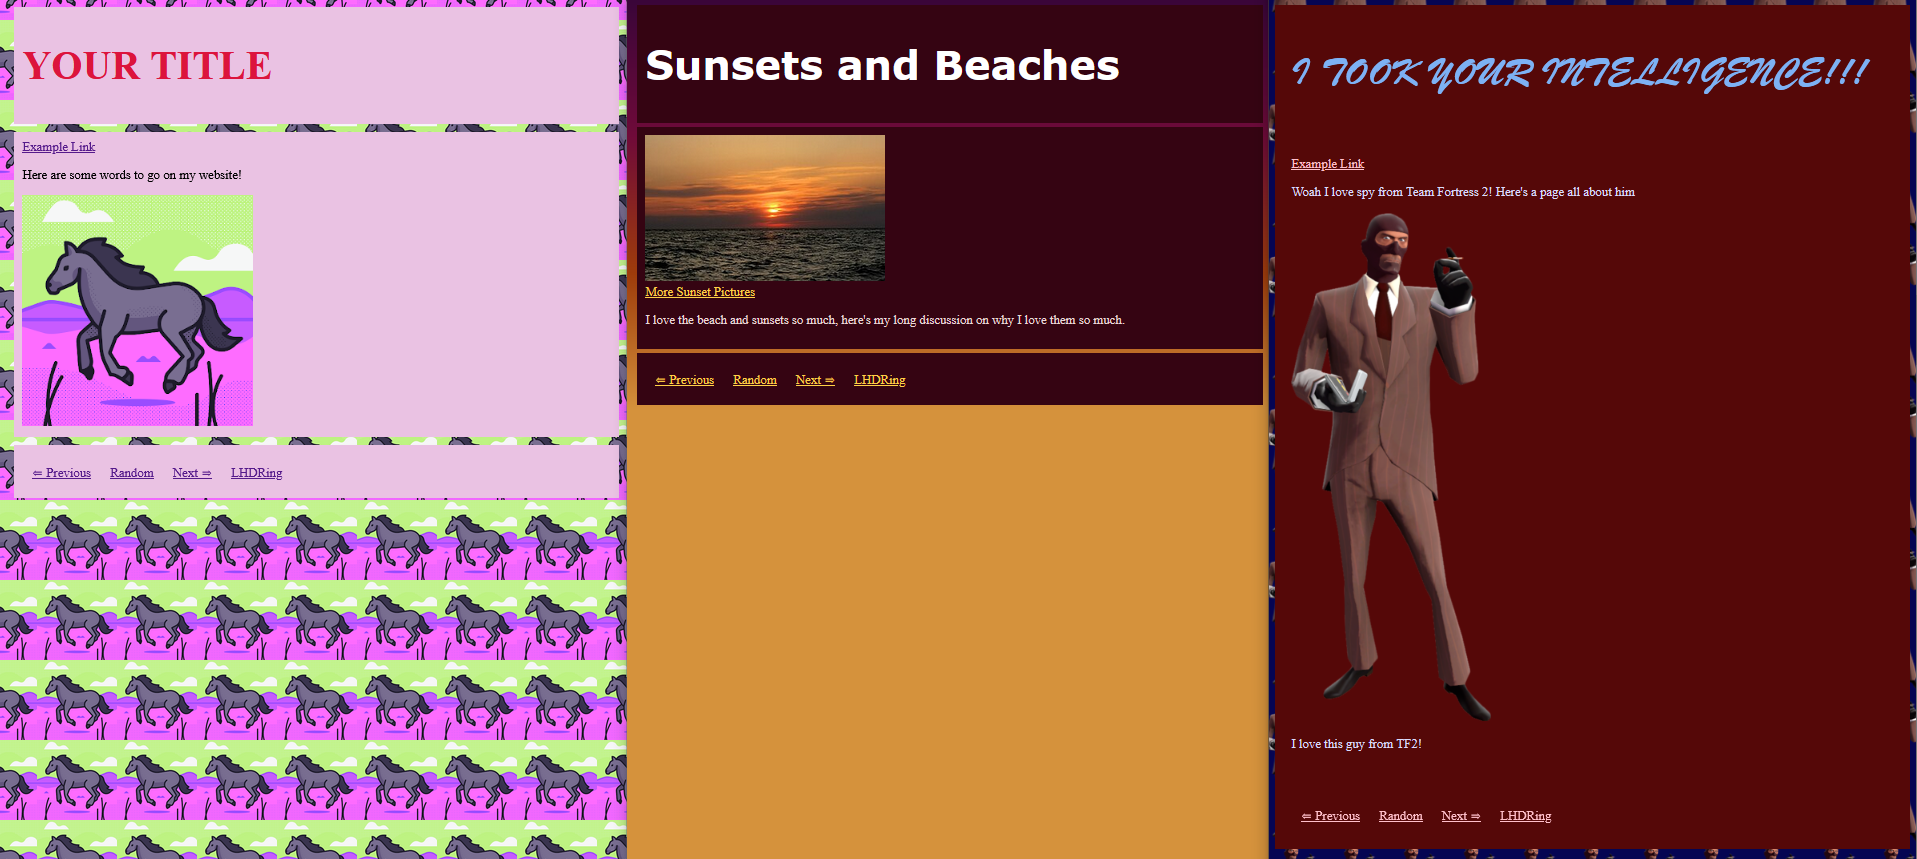
Learning to make your own layouts is extremely rewarding, and allows you to create interactive websites without needing to rely on 3rd party code. Once you complete this tutorial feel free to explore other tutorials, such as the W3School classes.
- To start, navigate to the <body> section of your home.html file and write the code below between the body and /body tags:
<h1>YOUR TITLE</h1>
When you save and view your site, "YOUR TITLE" will show up as large text at the top of the page. The <h1> tag is a Heading tag, which lets you put titles on your page. The tag scales from h1 to h6, with the bigger numbers getting smaller. Try changing your h1 tags to h2 tags, then h3, then h4, and see how it changes the text. - To add links to your page you use the <a> tag, which looks like this:
 <a href="URL HERE">WORDS TO SHOW</a>

<a href="https://lordhorse.neocities.org/">Example Link</a> - To add images to your page you use the <img> tag, which looks like this:
<img src="URL HERE">

<img src="https://lordhorse.neocities.org/_siteImgs/favicon.png"> - With those three tag types combined, you most likely have something like this in your body tags:
<h1>YOUR TITLE</h1>

                          <a href="https://lordhorse.neocities.org/">Example Link</a>

                          <img src="https://lordhorse.neocities.org/_siteImgs/favicon.png">
This is a great start and a functional website, even if it's simple right now. We'll take a break from the function and look to formatting the code you currently have. - Go to your folder view and find your style.css file, click the 'edit' option when you hover over it. Coding CSS is different to HTML, so we'll start by styling the h1 tag. First, give the CSS code the tag you want to customise by typing the following:
h1 { } - Inside that code you'll now specifiy what color you want the text to be, you can use a hex code, an rgb value, a hsl value, or a color name. For this tutorial we'll use a hex code, an rgb value, and a color name.
To specify to color of the text in an element, you use the color attribute:
h1 {color:Crimson;} - We'll also change the font size and type, which you can do with font-size and font-family:
h1{color:Crimson; font-size:50px; font-family:"Times New Roman",serif;}
With font-size you can use many different values, but the main ones used are %'s, px, and em. em relates to font-size, so if the font-size of the whole document is 14px, 2em is 28px. em is good to use when your site scales with the font-size.
The font-family code has two fonts listed as a failsafe. You can list as many fonts as you want (font names with spaces NEED to be in quotes ("")) and the code will go through them, left to right, until it finds a font that works. Serif and Sans-serif are best put last so the browser can grab any font that works. - When you view your site again (after saving your files) your h1 title will look different. If you're not happy with how it looks but don't want to keep slowly fiddling with the CSS code and checking each time, here's a trick: right click on your h1 title and click the 'Inspect' option. You can also type:
ctrl/cmnd + shift + c
From there you'll see your CSS code and be able to change it to test things. It won't save over your CSS file, but you can copy the code you change into your CSS file rather than having to tinker with it over and over (The screenshot below was taken in Firefox, your inspector may look different).

- While you're here also feel free to change the colour of your <a> tag if you're confident on how to use it. Go back to your home.html file when you're ready.
- Your website is currently on the same line, except the h1 tag, so to fix that you can either put things in boxes or add newline characters. To add a new line you can't press enter in the code, you have to add a <br> tag:
<h1>YOUR TITLE</h1>

                          <a href="https://lordhorse.neocities.org/">Example Link</a><br>

                          <img src="https://lordhorse.neocities.org/_siteImgs/favicon.png">
Now your link won't be on the same line as your image. - Now we'll put your title, link and image, and the widget at the bottom of your page in separate boxes to keep them apart. You'll need to wrap them in <div> tags like so:
<div><h1>YOUR TITLE</h1></div>

                          <div><a href="https://lordhorse.neocities.org/">Example Link</a><br>

                          <img src="https://lordhorse.neocities.org/_siteImgs/favicon.png"></div>

                          <div><span id="LHDRingWidget"></span></div>
<div> tags are containers that put everything inside of them into a block, which we can then style however we like. - Inside that div tag you're also going to add some normal text to go around your image. You can do this by writing plain text outside of the a or img tags, or by writing it inside of a <p> tag:
<div><h1>YOUR TITLE</h1></div>

                          <div><a href="https://lordhorse.neocities.org/">Example Link</a><br>

                          <p>Here are some words to go on my website!</p>

                          <img src="https://lordhorse.neocities.org/_siteImgs/favicon.png"></div>

<div><span id="LHDRingWidget"></span></div> - Go back to your style.css file, we're now going to add the background and style everything we didn't do last time.
- To start we'll add the background. You can either add a background color or image, for this tutorial we'll make the page background a repeating pattern and make the container background a colour. Add the following code to your CSS file:
body {

                            background-image:url("https://lordhorse.neocities.org/_siteImgs/favicon.png");

                            }
When you view your page again you'll see the icon in the background, however you might want to make it not repeat, or change its size. To do that you can add:
body {

                              background-color: blue;

                              background-image: url("https://lordhorse.neocities.org/_siteImgs/favicon.png");

                              background-repeat: no-repeat;

                              background-position: center top;

                              background-attachment: scroll;

                              background-size: 300px 100px;

                            }
Color sets the background color of an element. Repeat sets if it should repeat across the element. Position tells it where to position the starting image. Attachment tells the background if it should scroll with the page, or if it should stay fixed. Size tells it how big the image should be. You can search up each attribute to learn more about it, but for now lets set the background image to tile and stay fixed when scrolling:
body {

                              background-color: blue;

                              background-image: url("https://lordhorse.neocities.org/_siteImgs/favicon.png");

                              background-repeat: repeat;

                              background-position: center center;

                              background-attachment: fixed;

                              background-size: 100px 100px;

} - Now we'll add our div colors so we can read our text. Try to add a background color to your div by yourself, then copy the code below if you want a reference:
div {background-color:#eac2e3}
This CSS uses a hex code for the colour, which you can find in any modern colour picker. - You can now read your website again, but your text is right against the edge of your box and the widget is still touching the other box. To fix this we can add padding, adding a border inside the box so elements don't touch the edges, and a margin, adding a border outside the box so the box doesn't touch other things:
div {background-color:#eac2e3; padding:10px; margin:10px;}
Padding and margin also take %'s and em, but the % uses the size of its container and em uses the font-size you set this element to. For now though, experiment with your padding and margin until you're happy with the gaps. - One last thing about CSS is that you can use selectors, which tell the page to only use that code if the element meets a certain criteria. For example: one selector type is the :hover selector, which only activates when a user hovers over the element. We're going to use that to style our links, so that when someone hovers over them they change color. The code would look like this:
a:hover {color:rgb(163,21,115);}
This code uses a rgb value, which can be found by combining the red, green, and blue values in a colour picker. - With that, you've now made a website! You can add more text and fiddle with your CSS until you're happy with it. It's recommended to look at websites you like the design of and inspecting them (either by right clicking or by looking) to see how they made their layouts. You can also add some cool tools to your site by using some of the javascript code at the bottom of this page.
- To start, navigate to the <body> section of your home.html file and write the code below between the body and /body tags:
- With either method, your page is now functional and ready to go! If you have any questions or need any help, don't hesitate to reach out to Marc / Scribblemakes on Discord. If you want to add more things to your site, you can check out the coding tutorials on the left or scroll to the bottom of this page for more resources.
Site Information
What is the Clubhouse?
The Clubhouse is the entire site. It's run by multiple members of LHD who create 'rooms' (html pages) that the home page links to, creating a 'house' of 'rooms'. Every member adds their own space and each room can be vastly different from another.
What is the Neighborhood?
The Neighborhood is a collection of external links that LHD members can add, similar to adding other 'houses' to the site to make a neighborhood. Users can link to their own sites, social media, and any websites they want to share.
How do I make my own clubhouse?
Make a free neocities account (https://neocities.org/) and collect a group of friends who want to make the clubhouse with you. In your account you can create new pages for each friend who wants to take part, for example you could make friend1.html and friend2.html. When you have some pages made, create links to each page in the index.html page. Give your friends the account's log in information so they can edit their pages, and you're done!
With a basic clubhouse set up you can then learn more about coding and styling your site. It's recommended to start with the neocities tutorial and then expand to others (like W3Schools and the Mozilla web resources). Some coding tutorials are included in the bar on the left.
Joining the Clubhouse
What happens when I join the Clubhouse?
Once you've claimed a room and agreed to the rules, you'll have the following steps to complete:
- Log into Neocities.org with the username and password you're given for the Lord Horse Clubhouse, then locate the folder named after the room you chose. You'll be told and shown ahead of time what that folder looks like. You can then create your own page there freely or use the step by step tutorial at the top of this page to set it up. It will come pre-supplied with a home.html file, a style.css file, and a script.jss file.
- If you'd like some pre-set features, such as the layout already being set up for you, the page having a different cursor icon, a script that lets you click to enlarge images, and so on, please let Marc / Scribblemakes know ahead of time and it'll be added for you.
- You'll be given an image that represents where your room is in the house and have the option to add your room in yourself or have the room drawn for you:
- If you choose to make it yourself, you'll get instructions on what files you need to provide so your room can be added to the interactive map. You can choose to animate your room if desired
- If you choose to have your room drawn for you, you'll need to provide a description of what you want your room to look like and how it animates (if at all).
Also try to keep your file uploading to a minimum, since this is a free neocities account there's limited storage space for everyone to use. If you want to use an image, video, or audio file: you can upload it to another site like Discord, or your own neocities, and then link to it (Note: this may change in future if the account becomes a supporter account).
I want to join but can't decide on a room
- Bedroom
- Kitchen
- TV room
- Playground
- Airplane
- Tree
- Mystery hole
- Cupboard
I don't know what to put in my Clubhouse room
Your page can be anything you like: a page all about your favourite animal or game, a game made with the TWINE engine, a bunch of pages about your OCs, a collection of links to your favourite things, or even a page that looks like the room you picked. For example, if you picked a bedroom: you could have a picture of a bedroom as the background and write a diary to go with it.
How do I add my room to the interactive map?
Once you have the template check that it's 1500px by 750px. Your image will need to be this size exactly to work with the map.
Open the template in your image editor / drawing program of choice, the program will need to support transparency (i.e. mspaint will not work). The template will have a shape drawn on it that marks your room's 'bounds', you should draw your room within those bounds and fill the shape as closely as possible. Once you're happy with your room, export the room without the template as a static transparent image. Send this image to Marc / Scribblemakes and you're done
If you'd like your room to change or animate when it's hovered over, you'll need to make another transparent image (transparent .gif for animation) and send it to Marc / Scribblemakes. This image will also need to be 1500px by 750px and stay inside the bounds you were given.